Documentation
This page contains the prerequisites needed to start CloudInAjar as well as the various installation methods and configurations. Specific providers will have their own subsection or be specified in the documentation.
Getting Started
This section explains what is required for the installation of CloudInAJar. Some default tools may not be listed in the prerequisites, but they are required. These include tools such as uuidgen, jq, and curl. Various keys like your private and public keys, storage keys, and other vendor specific steps are required. These instructions will be listed under the provider’s subsection.
Prerequisites
Github
Navigate to https://github.com/jarwarellc/cloudInAJar
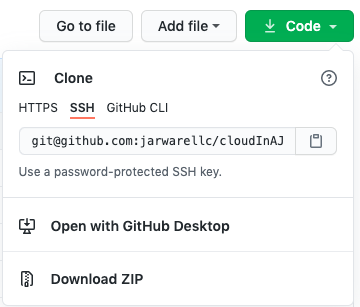
Clone the repository in your environment.
$ git clone git@github.com:jarwarellc/cloudInAJar.git
Alternatively you can download the zip file and unzip it in your desired path.
Configuration
You must populate the config file located at
<CLOUDINAJAR_PATH>/config/config.tfvars
You must fill in the general parameters. This would include your private key path, your public key contents, and your namespace scheme. Below is an example of a filled out config file.
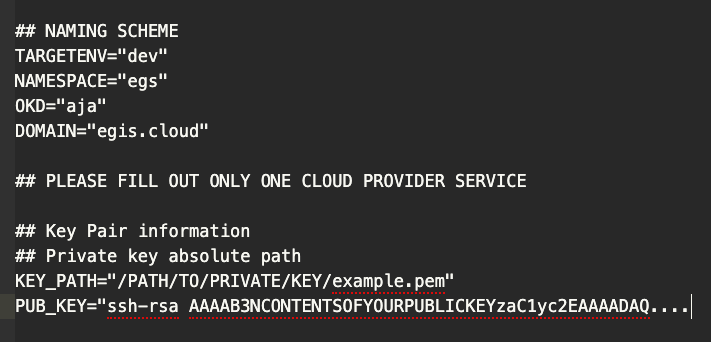
To complete the configuration we will have to move on the cloud providers specifics.
AWS
This section explains the steps needed to make and retrieve your AWS secret. Using this information, you will have everything you need to start CloudInAJar in an AWS Cloud enviroment.
Navigate to the link below and create your AWS secret.
https://docs.aws.amazon.com/secretsmanager/latest/userguide/tutorials_basic.html
Once you have your AWS secret key and ID, please fill in your information in the configuration file mentioned in the above configuration section. An example is shown below.

Once you have completed inputing the parameters in the configuration file you can either navigate to the custom install or quick install section.
Azure
This section will lay out the parameters needed to deploy CloudInAJar into the Microsoft Azure Cloud.
The link below explains in detail how to create an app registration as well as your azure secret. In this process, you will be able to see your Client and Tenant ID.
https://docs.microsoft.com/en-us/azure/openshift/howto-aad-app-configuration
From you azure account you can find your Subscription ID. Using these parameter you can fill out the Azure section of the config file. An example is shown below.
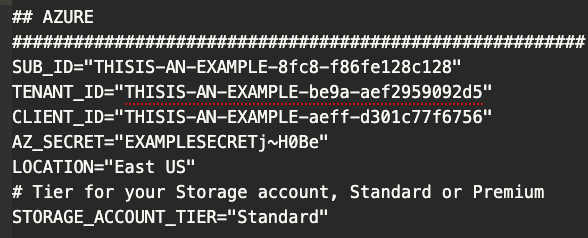
Once you have completed inputing the parameters in the configuration file you can either navigate to the custom install or quick install section.
Coming Soon
Quick Install
This section highlights how easy it is to deploy CloudInAJar. The quick install deploys our default CICD toolset. These tools consist of Jenkins, Gogs, Nexus, and SonarQube. Additionally, a demo project will be made in the Gogs repository. This demo will have a functional jenkinsfile capable of running though CloudInAJar’s pipeline.
Installation
To start the install, use the command below
$ sh quick-install.sh
This will take around 30 minutes as CloudInAJar sets up your infrastructure and configuration. CloudInAJar uses Terraform to orchestrate and Ansible to configure. After the installation process is complete, use the command below to get your credentials.
$ sh okd-get-credentials.sh
You should see your credientails like in the example below.
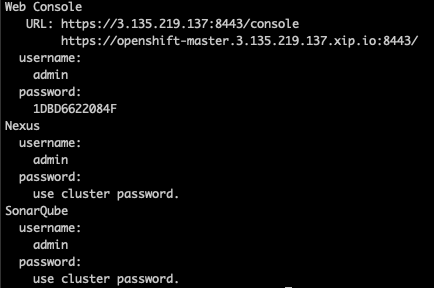
Using
$ oc get pods
You can monitor the deployment of tools in your cluster. Example shown below
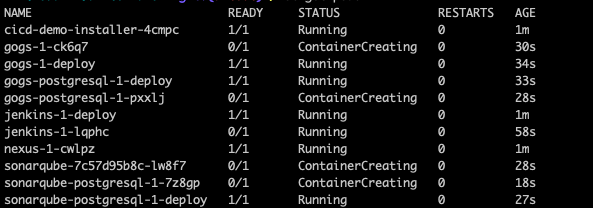
When all the pods are running, log into Openshift with the url listed on the okd-get-credentials command.
After logging in, navigate to the the Openshift console and select the cicd project. By selecting build -> pipelines you will be able to see a demo pipeline listed.

Default Demo
You can choose to run the demo project pipeline to test if the other services like Nexus or SonarQube are configured properly.
You should see links to your Jenkins server when starting the pipeline.
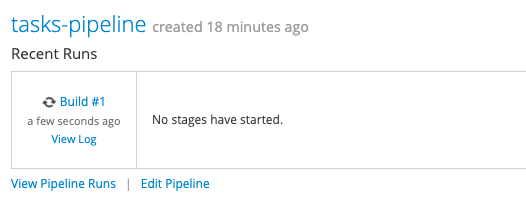
You can add new applications and jenkinsfiles into the cicd project. With this, CloudInAJar is successfully deployed and functional. You have Gogs, SonarQube, Jenkins, and Nexus all running in your new cluster.
Custom Installation
CloundInAJar offers tool by tool installation. While Kubernetes needs to be installed for our tool to function, other tools such as Nexus, SonarQube, and Jenkins can be omitted from the installation. This could be in the case that you already have a these services available in your cloud infrastructure.
The steps included in the OKD Kubernetes section are required to install the other services listed below.
OKD Kubernetes
The orchestration of CloudInAJar’s infrastructure and the installation of OKD Kubernetes is bundled into one command. Make sure you have filled out the configuration file mentioned in the Configuration section of this document.
To begin this process, use the command below
$ sh okd-build.sh
This process will take around 30 mins. Feel free to grab a drink or get some fresh air.
After the installation is complete you will see an output similar to the example shown below.
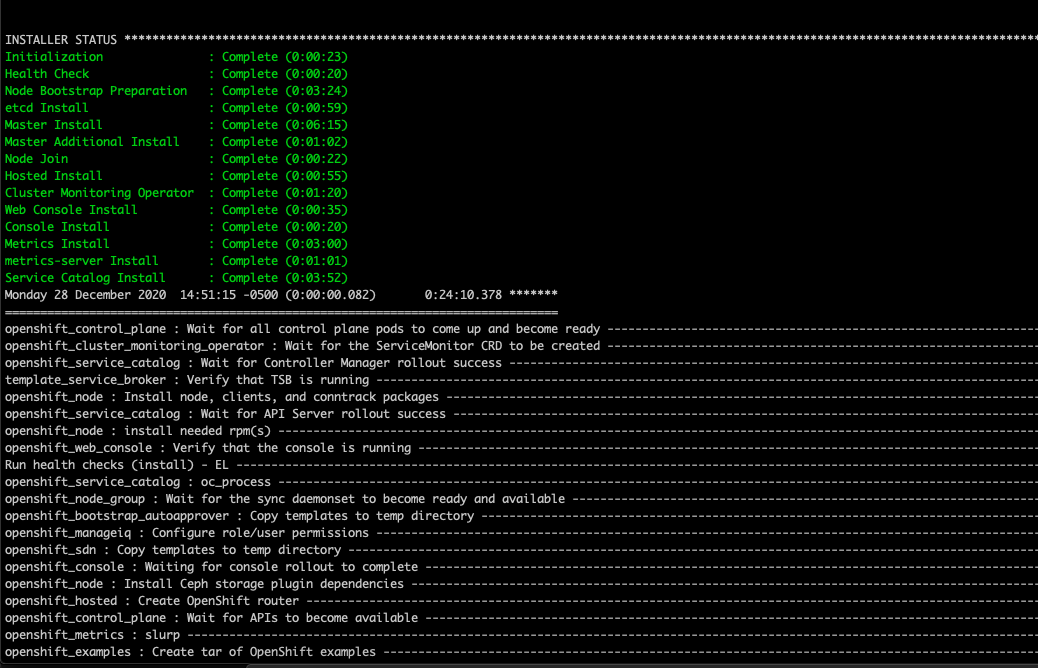
Confirm the installation by checking if there were any errors.
With this you are done orchestrating and configuring your OKD Kubernetes cloud infrastructure.
Confirm the installation by checking if there were any errors.
With this you are done orchestrating and configuring your OKD Kubernetes cloud infrastructure.
Jenkins
Jenkins is a trusted service that provides the core feature in many automation pipelines. You can install Jenkins into your OKD Kubernetes cluster by using the command below.
$ sh okd-build-jenkins.sh
You can track the progress of your Jenkins pods by using the “oc get pods” command. By navigating to your OKD cluster console you can find the URL needed to log into your new Jenkins service.
SonarQube
SonarQube is another tool that has been field tested and implemented on many pipelines. SonarQube collects your test reports into a neat and clean user interface. You can use this information is successfully track your application test history and manage your quality gates. Many developers see SonarQube as a necessity in automated testing.
By using the command below, SonarQube can be deployed into your cluster.
$ sh okd-build-sonarqube.sh
You can track the progress of the deployment by using the “oc get pods” command and navigate to the service using the URL provided in the OKD cluster console.
Nexus
Nexus is used to manage and store your application and service images. This image repository is widely used and works in conjunction with OKD Kubernetes.
By using the command below, Nexus can be deployed into your cluster.
$ sh okd-build-sonarqube.sh
And with that your Nexus deployment is complete. You can monitor the nexus deployment by using the command “oc get pods”. The URL will be provided in the OKD cluster console.
